
Have you got a laptop that is either completely dead (with no lights) or flashes some kind of error code instead of turning it on? This article is here to help!
At Pure IT we process, test and repair over 10,000 laptops and desktops every year. As a result, we often come across laptops in this condition.
This article shares the process we go through when this happens. In 2022, using this method helped us to revive around 37% of our laptops which would not start.
This post breaks this down into two steps: reviving the laptop and finding out what caused the fault in the first place.
Phase One: Revive The Laptop
The two major steps here are a complete reset and to check/clean the RAM connections.
1. Fully Reset The Laptop
To do this, simply:
- Unplug the laptop charger
- Open the back cover
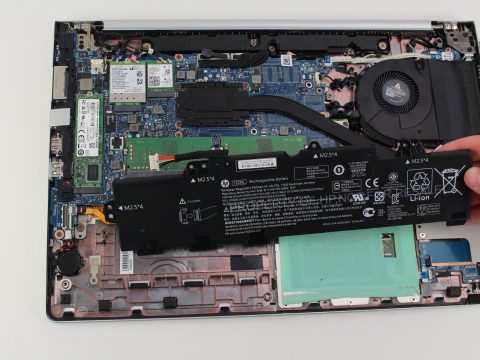
- Remove the main laptop battery
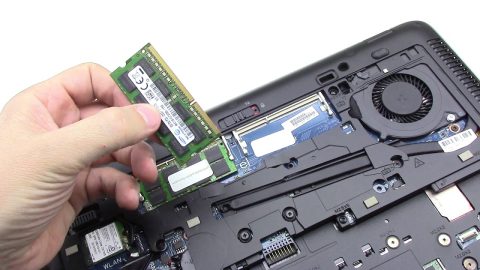
- Remove the RAM stick(s)
- Remove the Hard drive or SSD
- Remove the CMOS (BIOS) battery (see notes at the bottom how this may affect your BIOS settings)
- Finally, press and hold the power button for 2 seconds to completely drain any remaining power in the laptop.
2. Check The RAM Connection
This is one of the most common reasons for a laptop not to start. To see if this is the issue, you must thoroughly check the contacts both on the RAM stick and also the RAM slot on the motherboard.
For the RAM chip, use a bright light to check for any corrosion or dirt stuck on the gold plated connection. Use alcohol and a clean cloth to wipe the connection and scrap off anything that looks like corrosion
For the RAM slot, check the RAM slots on the motherboard with a bright light, as even a small piece of dust can cause the laptop not to start. Use a clean fine brush or a small amount of compressed air to clean the slot.
Now it’s time to put the laptop back together in the sequence detailed below. This way you can identify if there is a faulty component causing the laptop not to start.
Phase Two: Finding The Fault
When it comes to finding what caused the fault, you should start with the minimum amount of components and add more each time to see what is causing the issue. Here is our five step fault finding sequence.
Test 1
Insert the following components:
- CMOS (BIOS) battery
- RAM after it has been cleaned, using only 1 stick if you have multiple sticks.
- Charger (without the main battery)
Try to start the laptop. If the laptop starts, proceed to fit the rest of the components.
Test 2
Add the following components to Test 1:
- Laptop battery, (some laptop models will not work without the battery connected)
- Test with all components from test 1 along with the laptop battery. Test with both the charger connected and disconnected
If the laptop starts, proceed to fit the rest of the components
Test 3
Re-run tests 1 and 2 with a different RAM stick and/or using the other RAM slot on the motherboard. Often the RAM slot can be faulty stopping the laptop from starting.
If the laptop starts, proceed to fit the other RAM chip and the rest of the components.
Test 4
If none of the tests above have brought the laptop back to life, it is worth resetting the motherboard again using the instructions in Phase 1. But this time, use a spare battery and a spare RAM stick from a laptop that you know is working.
Test 5
If everything is done correctly; you should really be seeing some change after tests 1-4. If Test 4 doesn’t work, it is worth running the motherboard reset again. Test 5 and any further repeats of any of the tests are only likely to give you results if you have seen some changes in the systems following the initial tests.
An Important Note On BIOS Settings
Once you have disconnected the BIOS battery, you will lose the BIOS settings (except any BIOS passwords).
Often the default BIOS settings will not be what your laptop runs on, and this may cause Windows to hang when starting. If this occurs it is best to check the following 2 settings in your BIOS:
- Check if the boot sequence is set to UEFI or Legacy. Most laptops should be set to UEFI, but it is worth trying both if Windows is hanging on start up.
- SATA operations – check if this is set to AHCI, ATA, RAID or even disabled. The most common setting is AHCI, but it is worth trying some of the other options if Windows hangs on boot.
That’s It!
Following the steps above should help you revive many laptops you’d given up on. We hope this guide helps you revive some out of warranty laptops that are piled up in your IT room, or helps you fix any laptops in the future.
If you have any questions about IT hardware, please get in touch with our friendly team here.


